
Backing up your Mac will save all your important data and memorable photos when your hard drive fails or your computer crashes. To prevent the loss, you should back up your files on a separate drive that you can restore from if anything happens to your computer. And this can be done with the built-in backup application, Time Machine on your Mac. It’s easy to set up, and you don’t need to worry about your files after that. Moreover, you can customize your Time Machine experience according to your needs. Here’s how to backup Mac with Time Machine.
What you will see?
- What is Time Machine?
- How does Time Machine work?
- Set up and start using Time Machine
- How to selectively back up with Time Machine?
- How to make sure Time Machine is backing up properly on your Mac?
- Restore from a Time Machine backup
- Delete older Time Machine backups
- How to encrypt your Time Machine backups?
- Use Finder with Time Machine
- How to restore individual files from a Time Machine backup?
- View Time Machine backups from another Mac
- How to use Time Machine with multiple Macs?
- Speed up your Time Machine backups
- Conclusion
What is Time Machine?
Time Machine is Apple’s built-in backup system in macOS. Time Machine backs up all the files on your Mac, like apps, music, documents, photos, emails, etc. When you connect an external hard drive over USB or Thunderbolt (or FireWire, for older Macs) for a wired connection, or over a network for a wireless connection, it backs up hourly, daily, or weekly. Also, it deletes older backups as the backup drive starts running out of space.
How does Time Machine work?
Time Machine stores backup files hourly, daily, and weekly as long as your drive doesn’t run out of space. It also deletes older backups as the backup starts running out of space. It is to be noted that Time Machine is not a space to store archival data or records.
What type of external storage devices can you use with Time Machine?
- External USB, Thunderbolt, or FireWire drive connected to your Mac
- An external drive connected to an AirPort Extreme Base Station or AirPort Time Capsule
- AirPort Time Capsule
- A Mac shared as a Time Machine backup destination
- Network-attached storage (NAS) device that supports Time Machine over SMB (Server Message Block)
For G-Technology G-Drive 1TB,

For AirPort Time Capsule (2TB),

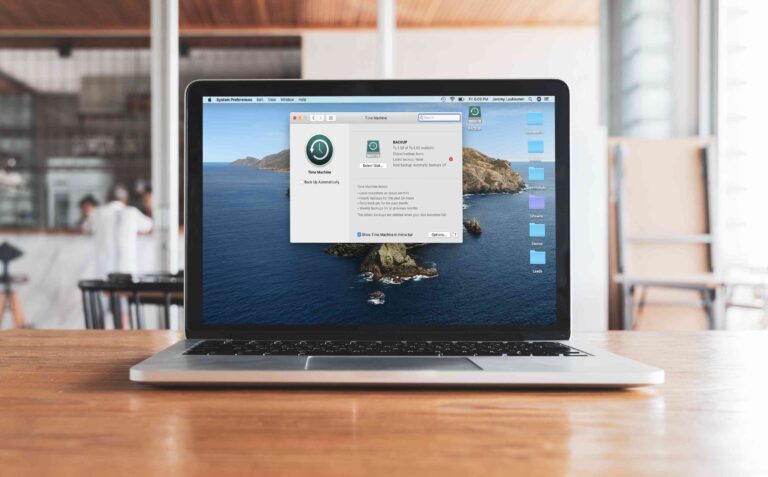
Set up and start using Time Machine
After you set up Time Machine, you can start the backup Mac on Time Machine:
- Select System Preferences from the Apple menu.
- Choose the Time Machine icon.
- Click Select Backup Disk.
- Select which disk you’d like to use as a Time Machine backup.
- Check the Back Up Automatically box in order to automatically back up your Mac to your chosen disks.


Once the first backup is complete, Time Machine will check your Mac for new, changed, and deleted files regularly to make backups. Time Machine keeps a daily backup for the past month. IAlso, weekly backups are kept as long as the storage device still has space. Once the storage device runs out of space, the oldest backups will be deleted from Time Machine.
If you want to back up your Mac manually, click the box next to Show Time Machine in the menu bar. Then click the icon in your menu bar and select Back Up Now.
How to selectively back up with Time Machine?
If you don’t want to back up every single file from your Mac, you can select the files you want to back up. Here are the steps to to do so:
- Open System Preferences on your Mac.
- Click Time Machine.
- Select Options….
- Click the + button.
- Choose the files or folders that you wish to exclude. You can select applications, files, and folders to exclude. You can select multiple items at once by holding the Command key on your keyboard.
- Click Exclude.
- Click Save.


How to make sure Time Machine is backing up properly on your Mac?
Even the backup systems sometimes fail, so you need to check if the Time Machine is doing its job properly. Here are the steps for you to check the backup Mac with Time Machine:
Restore and verify
You can confirm if your backup files are synced by simply restoring a file (or files) using Time Machine.
- Select System Preferences from the Apple menu.
- Choose the Time Machine icon.
- Check the box next to Show Time Machine in the menu bar.
- Click Enter Time Machine after clicking the Time Machine icon in the Menu bar.
- Find the file or folder in question and click Restore.


Verifying networked Time Machine backups
- Hold down the Option key on your keyboard while clicking on the Time Machine icon on the menubar.
- Click Verify Backups.
According to the size of backup files and speed of Mac, verification time changes. macOS will alert you if there is a problem, while the backup process is carried out.

Verifying local Time Machine backups
When you use an external storage device for backup Mac with Time Machine you can’t use the above steps. Instead, you’ll need to verify your files using Terminal.
- Make sure your backup drive is plugged into your computer.
- Click on the Spotlight Search icon on the Mac menubar.
- Type “Terminal” in the search box.
- Select Terminal under the Top Hits results to open Terminal.
- In Terminal, copy and paste the code
tmutil compare –s. - Click Return on your keyboard. In doing so, the system will compare the contents of your Mac with the contents of your backup. Depending on the size of your backup drive and speed of your Mac, this report can take up to 15 minutes to complete.
You’ll see the following items on this report:
- A ! before a file means the given file has changed.
- A + before a file means the given file is new.
- A – before a file means the given file was deleted.
A summary will be shown which will indicate how much storage was added, removed, and changed. The best way to verify that your Time Machine backups are sound is to restore one or more files as a test. But, if you want in-depth annalysis, other options are available.


Restore from a Time Machine backup
- Select System Preferences from the Apple menu.
- Choose the Time Machine icon.
- Check the box next to Show Time Machine in the menu bar.
- Click Enter Time Machine after clicking the Time Machine icon in the Menu bar.
- Find the file or folder in question and click Restore.


Delete older Time Machine backups
The macOS Time Machine app is for backups, and files are stored in two locations. The external hard drive keeps actual backup files and local snapshots, which are taken each day, are kept on the internal hard drive.
There are two ways to delete older backup files from the Time Machine external drive. Either use the actual Time Machine app or delete the files using Finder on your computer. Both ways require that your hard drive is connected to your Mac.
Deleting files stored on an external drive using the Time Machine app
- Click on the Time Machine icon on the Menu Bar and select Enter Time Machine.
- Scroll through your backups and find the one you want to delete.
- Click on the Gear icon.
- Select Delete Backup.
- If requested, enter your password.

Deleting files on an external drive using Finder
- Click on the Finder icon
- On the left-hand side, click on your backup drive that’s located under Devices in the panel.
- Under Backups.backupdb, find the subfolder for the Mac machine that’s backed up.
- Scroll down until you find the subfolder for the date you’d like to delete.
- Right-click and select Delete.
- Confirm your choice to delete.
- Note: You’ll have to delete these files in the Trash too.


How to encrypt your Time Machine backups?
Time Machine is Apple’s built-in backup system for the Mac. Once you turn it on, it makes a backup of your Mac and then keeps it up to date (hourly, daily and weekly). While it’s not encrypted by default, you can enable encryption when you set it up.
If you’re attaching a new drive, Time Machine might detect it and ask to use it. In that case:
- Check the Encrypt backups box at the bottom left.
- Click on Use as Backup Disk.
If it isn’t detected or you want to use an already connected drive:
- Click on the (Apple) icon in the Menu bar.
- Select System Preferences.
- Click on Time Machine near the bottom.
- Select Select Disk…
- Click on the Disk you want to use for your backup.
- Check the Backup Automatically box so you don’t have to remember to do it manually.
- Check the Encrypt backups box at the bottom left.
- Enter a password to encrypt the disk.
If you have an existing, non-encrypted Time Machine backup on the same volume, you’ll have to remove the disk first and then re-add it as an encrypted volume. Make sure that you copy all the old files or versions of files you might need beforehand or else you’ll lose it when the drive is reset for encryption.


Use Finder with Time Machine
You can use Finder to restore files through Apple’s built-in Time Machine on Mac. When the time comes, you can use Finder to restore files through Time Machine. Here’s how to do it.
- Select the Time Machine icon on the Mac Toolbar.
- Choose Enter Time Machine.
- In Time Machine, click on a Finder window that represents a day. Once you do, the Finder window for that day moves forward to the front of the screen.
- Find the file or folder in question and click Restore.
- From here, you’ll be asked whether to replace the current file with the older one or same the older one as a duplicate.


How to restore individual files from a Time Machine backup?
- Plug-in your external backup disk and make sure it’s on.
- Go to the location where the original file(s) were located. For example, if you’re looking for a file that was under Documents, go into that location.
- Choose Enter Time Machine from the Time Machine menu.
- Find the items you wish to restore by using the timeline on the edge of the screen on the right. You can also use the up and down arrow.
- Select an item and press Space Bar to preview it and make sure it’s the one you want.
- Click Restore to restore the item you selected, or Control-click the item for other options.


View Time Machine backups from another Mac
- Plug-in your external backup device to your Mac and make sure it’s powered on.
- Go into Finder and click on the external backup device.
- Select the folder called Backups.backupdb.
- Double click on the folder with the name of the Mac.
- You will see folders identified for the dates backups occurred. Drill down to find the documents you wish to review.
- Copy and paste the files/folders you want to copy to your computer.


How to use Time Machine with multiple Macs?
If you use the same external drive to backup different Macs, Time Machine automatically creates separate folders for each computer. Also, Time Machine understands which files match the specific computer, whenever you restore files.
To back up different Macs using Time Machine, you can:
Do it manually
You can simply connect the external drive separately to each Mac and Time Machine will backup files in different folders for each Mac. The drawback to this approach is that you manually have to connect and disconnect the hard drive to each computer. Still, as long as you set up Time Machine on each Mac, you’re good to go.
Use networking
Otherwise, you can share backup drive using Personal File Sharing on macOS. The computers need to be connected to the same network so that you can use the same drive with Time Machine.
- Open System Preferences on the computer that’s physically connected to the hard drive.
- Click on Sharing.
- Check the box next to File Sharing.
- Click on the + button under Shared Folders to share specific folders. In this case, share the external hard drive.
- Click on the Everyone user under Users.
- To the right of Everyone, change the permissions from Read-Only to Read & Write.
- On another computer on your network, open a window in the Finder.
- Scroll down the sidebar until you see Shared.
- Select the Mac you’d like to access. In this case, select the shared hard drive.
- If you are required to log in, you may see a button labelled Connect As…


Speed up your Time Machine backups
The Terminal command is used to speed up Time Machine essentially disables the program’s throttling mechanism. You need to remember that Time Machine frees up space automatically, and eventually your Mac will slow down. But if you directly try to revert back to your original settings, Mac’s performance will deteriorate. Thus, you need to follow the steps to revert back to your normal CPU activity.
You need to make a fundamental change to the way the kernel schedules disk operations. Thus preventing processes that are supposed to have low I/O priority from being properly throttled. But, if you forget to undo this setting, it would have serious implications on battery life. Further, it would impact the gaming performance or other high-demand processes since they start to compete for resources, or could have other non-obvious negative consequences.
How to speed up Time Machine so it backs up your data faster?
If you regularly backup Mac with Time Machine, you will know that Time Machine is designed to work quietly and slowly in the background. The regular backups are incremental and don’t need much power. Using the Terminal command, you will disable the disk operation throttling so Time Machine will run faster.
- Click on the Spotlight Search icon at the top right of your computer.
- In the box, type in Terminal.
- Hit Return on your keyboard to activate Terminal.
- Type
sudo sysctl debug.lowpri\_throttle_enabled=0or copy and paste the command. - Hit Enter.
- Enter your Mac’s password.
- Close Terminal.


How to revert to your normal CPU activity
Although speeding up Time Machine backup is great, but it will have an impact on everything else. Thus, you don’t want the throttle disabled at all times. So, when you are finished with back up, you need to revert to having Time Machine run quietly and slowly in the background. Use this Terminal command to reenable the CPU throttle.
- Click on the Spotlight Search icon at the top right of your computer.
- In the box, type in Terminal.
- Hit Return on your keyboard to activate Terminal.
- Type
sudo sysctl debug.lowpri\_throttle_enabled=1or copy and paste the command. - Hit Enter.
- Enter your Mac’s password.
- Close Terminal.


Conclusion
From the precious family photos to the files you’re working on, you need to back them up so that you don’t lose them permanently. But don’t worry, you can backup Mac with Time Machine, which is a built-in app in your macOS. This is an easy way to restore your data when your computer crashes, virus, accidentally deletes the file or another common tech disaster. Time Machine is reliable, easy to use, and can keep your Mac backed up on a routine schedule. It is meant to run in the background, offering a simple way to backup. When activated, it will regularly backup Mac, hourly, daily, weekly and monthly.
If you have questions, ask us in the comments section below.


