It can be very tiresome to go through your inbox and delete junk, respond to emails, and organize communications into various folders. But With the Touch Bar from Apple, your life will become a little simpler. The Mail app on the MacBook Pro is easier to navigate with the Touch Bar, also you can customize your actions, too. Here’s how to use the Touch Bar with the Mail app on the MacBook Pro:
What you will see?
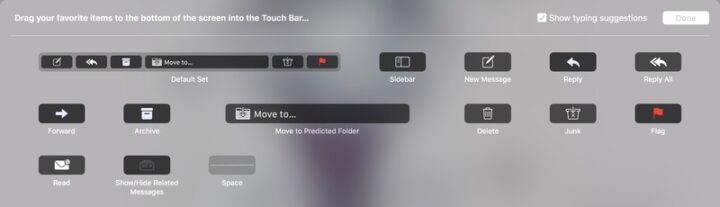
Customization of the Touch Bar in the Mail app
You can compose a new email, reply to all, archive emails, move them to a folder, junk, and flag the mails with the default settings of the Touch Bar on the Mail app. Moreover, you can change these default settings and set the tools which you use more frequently in the Mail app, according to your needs.
Although, you need to remember that is, if you have the Move to tool in the Touch Bar, you can have a maximum of six tools. But, if you don’t use the Move to tool, you can have as many as eight. This is because the ‘Move to’ tool is big. You get two sets of tools on the Touch Bar for the Mail app, one for the main mail system, and one that appears when you are writing an email. You can customize both of them according to your needs separately.

Customize the main Mail tools
- Open the Mail app on your MacBook Pro.
- From the app menu section of the Menu, bar click on View.
- Click on Customize Touch Bar from the drop-down menu.

- The customization panel will appear and your screen will blur. Also, the buttons located on the Touch Bar will enter jiggly mode.
- Further, you can drag the desired tool from the screen that you want to add to the Control Strip of the Touch Bar. Although the Touch Bar is not attached to the screen, it will seem like you have crossed a barrier with the tool. Put the tool you selected into the Touch Bar.
- Select a tool to remove from the Control Strip. When you move your cursor above the tools, they light up.
- After you select a tool from the Touch Bar, drag it to a new location on the Touch Bar to rearrange the order.
- Click Done when you are finished.

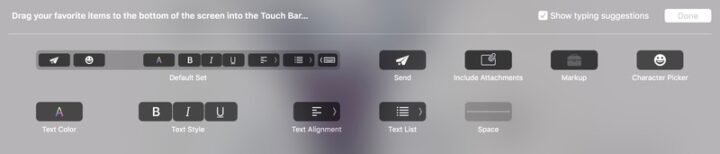
Customizing the email composition tools
To access the tool section in the customization panel, you need to go through the following steps.
- Open the Mail app on your MacBook Pro.
- Select an email and click on Reply.
- From the app menu section of the Menu, bar click on View.

Send an email using the Touch Bar in the Mail app
- Click on Compose icon to write a new email, which looks like a square with a pencil inside of it. You will see a new window with a fresh email to compose.
- To send a reply to an email click on the Reply icon. It is a curved arrow pointing to the left, or you can select the Reply All icon to reply to multiple people, it is two curved arrows pointing to the left.
- You can forward a mail by tapping on the Forward icon, which looks like a straight arrow pointing to the right.
You can write your content in the Mail app when the Compose, Reply, or Forward window appears in the app. In the email address section of the form, to get contact suggestions on the Touch Bar. You can then select the address you desire and it will appear in the address section of the email form.

In the subject or body of the email, you’ll see word suggestions. From the emoji icon, you can tap to access the various smiley faces. Tap the Collapse arrow next to word suggestions in order to access the formatting tools, which include text colour, font styles, paragraph positions, and lists.

To reply to an email, tap the Include Attachment icon to include any attached files with your response. The icon will look like a rectangle with a paperclip on it. Although currently there is no Touch Bar tool to attach a new file to an email. When you attach a new file to an email, the Touch Bar will show tools to choose the currently selected file or cancel the action.

When you are ready to send the email, tap the Send icon at the far left of the toolbar. It looks like a paper aeroplane.
Organizing your email with the Touch Bar in the Mail app
You get other tools to make organizing your inbox with the Touch Bar on the MacBook Pro. Moreover, You can archive, junk, delete, flag, mark as read or unread, and move to a predicted folder, all with just a touch of your finger. You can follow these steps to organize your inbox:
- To send an email to the archive folder you can simply hit the Archive button which appears like an office box.
- When you tap the Junk icon, the mail is sent to the junk folder. It is the box with an X and an arrow pointing downward. Also, when you send a mail to junk, future emails from the same address will be automatically marked as spam or junk.
- Click the ‘Move to’ icon to move the mail to a folder which macOS will set according to your past actions. For instance, if you move mails from your boss to a folder called “Work,” the Touch Bar will include that as one of the suggested folders. Moreover, you can see all your folders if you swipe to the left. So, if you want to go to a different folder than the suggested one, you can swipe to find the proper folder.
- To delete an email click on the Trash icon which appears like a trash can.
- When you tap the Mark Unread/read icon, it marks an email as read or unread. It seems either like an envelope with a dot or an opened envelope, depending on the status of the email.
- You can Flag an email, by tapping on the Flag icon. Although, if you long-press on the flag, it opens a subset of tools and you can change the colour of the flag.

Conclusion
With the Touch Bar, sorting through your inbox has become a lot easier. You don’t have to waste hours organizing your emails and send replies. Also, you can customize the tools you need more frequently and set them in the Touch Bar. There are two types of tools you will find on the Touch Bar for the Mail app. One is for the main mail system and the other one appears when you are writing an email. You can customize each set of tools separately. Also, quick suggestions will suggest your contact information or suggest words to complete the sentences in the body of the email.