With the Touch Bar on the MacBook Pro, tasks become a lot easier. The devices you every now and again use are only a tap away. The Touch Bar in the Notes app makes note-taking somewhat simpler. Here’s the manner by which to utilize the Touch Bar with the Notes app on the MacBook Pro:
What you will see?
Make a new note on the Touch Bar
You will see 3 tools on the bit Bar once you open the Notes app on your MacBook professional. These are New Note, Checklist, and Trash. To begin a brand new note all you would like to try and do is hit the Touch Bar once, on the New Note icon, that sounds like a square with a pencil within.

Format a note
You can utilize the formatting tools from the Touch Bar in another or recently composed note. Select a note to see the formatting choices and follow the means underneath.
- In the chose note click on the Format icon which resembles capital and lowercase A.
- Snap-on Title to make an H2 format.
- Hit Heading To make an H3 format.
- Hit and touch Body to make a body format for the note. You would then be able to format the Body after you hit Return.

- Snap the Bullets icon to make a bulleted list for the note.
- Snap-on the Dash icon to make a list with runs for the note.
- To make a numbered list hit the Numbers icon.
- Snap the X to close the formatting tools.
- To make a checklist for the note hit the Checklist icon.
- Further, to shroud the keyboard and uncover additional formatting tools click on the collapse arrow close to the keyboard word idea.

- To indent to one side or left of the margin for the note app, hit the Indent icon.
- Select the Bold icon to make a word or sentence intense.
- To make a word or sentence in italics hit the Italics icon.
- To underline a word or sentence hit the Underline icon. You can likewise change. If you have effectively composed content into the note, you can in any case change the format by setting the cursor toward the finish of the sentence and afterwards tapping one of the formats.

The Attachment View and Notes
The Notes app changes to a grid-style show of notes separated by either photographs and recordings, draws, maps, sites, brief snippets, or reports when you click on the Attachment View icon in the Notes app. In this view, you can utilize the Touch Bar to Get a Quick Look at the connection or hit and touch Show in Note to open the note that the media is joined to.

Unlock and open notes with Touch ID
You can open a locked note utilizing Touch ID on the MacBook Pro.
- In the Notes App choose a locked note.
- On the Touch ID sensor place your enlisted finger when provoked.
- You can lock all notes again by tapping the Lock icon at the highest point of the Notes app window.

Delete notes
With the assistance of Touch Bar, you can even delete notes or folders. There is a trash icon situated on the Touch Bar that you can utilize. Follow these means to delete the notes:
- To delete a note initially select the note.
- On the Touch Bar hit the Trash icon to delete the note.
- On the off chance that you need to delete an organizer, select the Folder.
- Hit the Trash icon on the touch bar to delete the folders.
You can utilize this to try and delete every one of your notes and folders as well.

Personalize the Touch Bar for the Notes app
It isn’t just, the advantageous thing to be considered is you can customize the Touch Bar for the Notes app. You get two choices for customization for two unique areas of the Touch Bar for the Notes app: the main tools and the formatting tools. Here’s the way to customize them:
Customize the main Notes tools!
Despite the fact that there are just three main tools, you can adjust them, eliminate them or add them back into the Touch Bar as you see fit.
- Open the Notes app on your MacBook Pro.
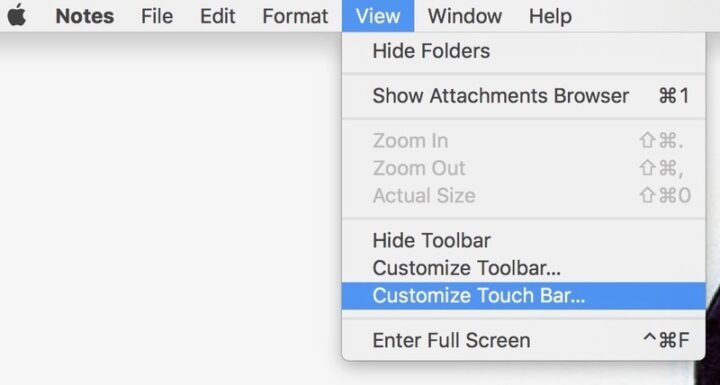
- In the app menu part of the Menu Bar click on View.
- Snap-on Customize Touch Bar starting from the drop menu.
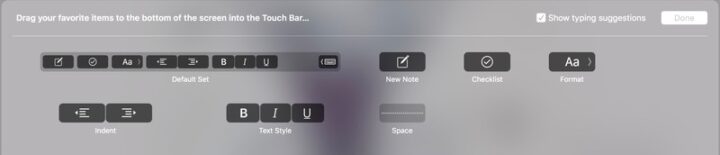
- At the point when the customization panel will appear your screen will obscure. Likewise, the buttons on the Touch Bar will enter jiggly mode.
- To add a tool to the Touch Bar, you just need to drag it from the screen and place it into the Touch Bar. It will appear like you have crossed an obstruction of the tool despite the fact that the Touch Bar isn’t connected to the screen. Drop it into the Touch Bar.
- Further, to eliminate a tool you can drop the cursor down into the Touch Bar and select a tool. The tools will show up p as you start moving your cursor above them.
- To revamp the request select a tool on the Touch Bar and drag it to another area on the Touch Bar.
- Snap Done when you are done with adding and eliminating tools.

Customize the formatting Notes tools
To get to the formatting also area in the customization panel follow these means.
- Open the Notes app on your MacBook Pro.
- Select any note you wish.
- In the app menu segment of the Menu Bar, click on View.
- For the subsequent stages follow stages 3 – 7 referenced above to customize the email composition tools.
Conclusion
With the Touch bar, you can easily work on the Notes app ad work gets done much faster. You can create and compose new notes in the app or delete older notes or folders with the help of the Touch Bar on your MacBook Pro. Not only this, you can even format your Notes in the app, all with the Touch Bar. Moreover, in the Attachment View icon, the Notes app switches to a grid-style display of notes filtered by either photos and videos, sketches, etc. Also, you can unlock a locked note with the Touch ID. Moreover, you can customize it and add tools that you use more frequently.
If you have any questions, you can ask us in the comments section below.