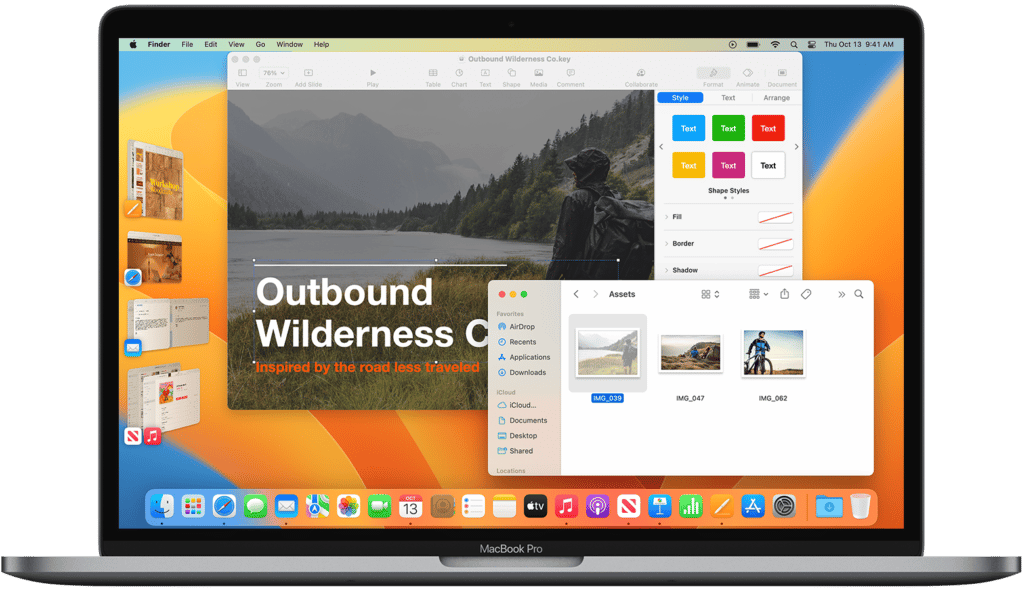
Stage Manager automatically arranges open programmes and windows so you can focus on your work while still having a quick view of everything. The window you’re working in is prominently displayed in the centre. On the left, additional open windows allow them to switch between tasks. Apple describes the new feature as Stage Manager automatically structures apps and windows so users can focus on the task while seeing everything at a glance. You can also group windows together if you’re working on a project or task that calls for various apps. You can access your desktop with just one click when using Stage Manager on Mac and other macOS windowing tools like Mission Control and Spaces.
What will you see here?
Know more about Stage Manager
Use Stage Manager on your Mac to keep your app in the foreground and your desktop clear. The window you are currently using is located in the centre of the screen, and your recently used apps are organised for easy access along the left side of the screen. Windows can be resized, arranged, and overlapped to create the ideal layout. In Stage Manager, you can also arrange various applications so that they operate as a group on the same screen. All of the apps in a group open in the centre of the screen when you switch to that group.
Activate or deactivate Stage Manager

You can quickly switch between traditional windows and Stage Manager to choose the best workspace.
Try one of the following on your Mac:
- Open the Apple menu on your Mac, select System Settings, and then click Desktop & Dock in the sidebar. You might have to scroll down. Then, toggle Stage Manager on or off by going to Windows & Apps on the right.
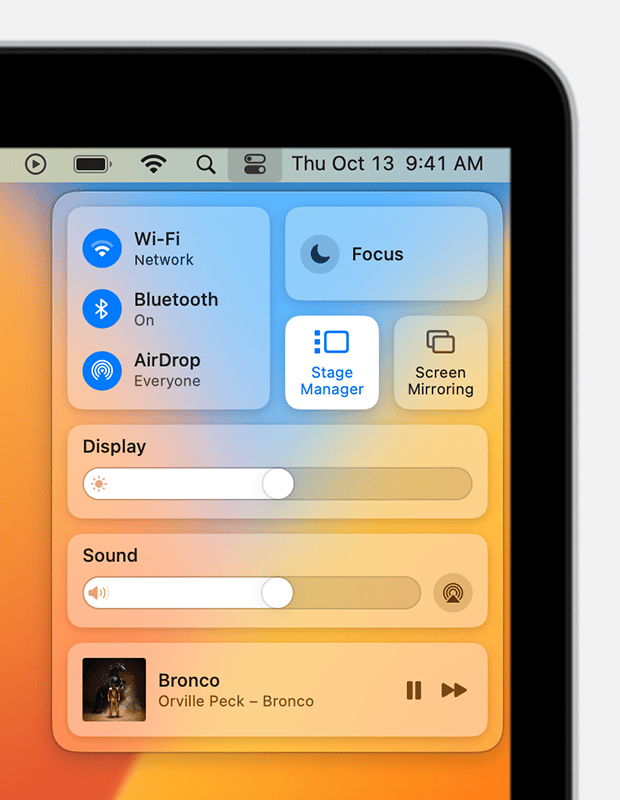
- To turn on or off Stage Manager, click Control Centre in the menu bar first.
Use Stage Manager on a Mac
Now open the desired applications. Apps will appear on the left side of the screen as thumbnails. It is active front and centre on the screen when the first app is launched or when there is only one app open. When you open another app, it changes into a thumbnail. More thumbnails appear as you launch more apps. Thumbnails of the most recently used apps appear if you have more than five open apps. When you close one of those, a different app that wasn’t previously shown as a thumbnail appears. The thumbnail row now includes one of the apps that aren’t currently visible.
Additionally, you can group apps, which is extremely useful.
To group windows or apps:
- On your Mac, open at least one programme.
- In Stage Manager, drag one app over the active app.
- Follow these instructions again to group more than two windows or apps.
- As you can see from the visualisation on the left side of the screen, the apps are now grouped together. These application windows appear on the screen when you click the group thumbnail. You can now switch between various window groups to move between tasks.
To Arrange windows:
- Drag the title bar or a window edge to move or resize the centre window.
- Drag a window group thumbnail to the centre window to start one. Alternatively, you can click the thumbnail while holding down the Shift key. Drag a window back to the side to remove it from the group.
- Press Command-H to make the windows and app’s thumbnail invisible.
- Press Command-Tab to navigate to a hidden app window.
Modify changes in the Stage Manager
- Open the Apple menu on your Mac, select System Settings, and then click Desktop & Dock in the sidebar.
- Turn the default process on or off by clicking Customize next to Stage Manager under Windows & Apps on the right.
- Recent applications:- On the left side of your screen, display recently used apps. Move the pointer to the left edge of the screen to briefly reveal recently used apps if this option is disabled.
- Desktop products:- Display objects on the desktop. Items on the desktop are hidden if this option is off. To access them, click the desktop to make them visible.
Enhance Mac’s menu bar
The following are some advantages to adding Stage Manager to your menu bar if you anticipate using the feature frequently:
- You can also choose to show it in the menu bar by going to System Settings > Control Center > Stage Manager.
- You can now switch Stage Manager on and off more quickly.
- To stop using Stage Manager, return to Control Center, click the Menu Bar button or Stage Manager, and then toggle off. Alternatively, you can choose to hide recent apps.
Utilize to arrange windows and apps

In the middle of the screen, Stage Manager displays the app you’re using. The side displays thumbnails of the other apps you are currently using.
- Click a thumbnail to open a new window.
- Click the desktop to access the files and folders there.
Based on current usage, thumbnails are automatically arranged; depending on the size of your desktop, up to six thumbnails may be displayed. Without opening that window, you could see updates like new messages because each thumbnail displays a real-time view of its corresponding window.
How well does Stage Manager operate on a Mac?
Stage Manager automatically arranges open programmes and windows so you can focus on your work while still having a quick view of everything. You can see the window you’re currently working in in the centre. On the left, additional open windows allow them to switch between tasks.
Conclusion
Here in this mentioned way, you can get an idea of how you can implement stage manager on Mac. With macOS Ventura, Apple introduced the new Stage Manager feature for Macs. Other Mac OS tools cooperate with the Stage manager and make your operation easy and efficient!


