You may occasionally have no sound or audio problems with Windows 11, 10, or earlier versions. Despite having speakers or an audio output device, there is no sound. This can be quite inconvenient, especially if you are attempting to do a task that requires you to hear audio on your Windows PC. If you are experiencing a No Sound issue on Windows 10 or 11, this article will undoubtedly assist you.
Basic stuff like sound output might malfunction after a seemingly small Windows 11 upgrade. Affected customers complain that sound no longer works on Windows 11, regardless of whether they use the built-in speaker or an external soundbar to play music. Previously, Windows 10 customers had the same no sound issue, and we collected a list of multiple workarounds. In a similar line, this post provides a thorough method for resolving no sound difficulties in Windows 11. We explored several strategies for detecting and correcting sound problems. So, on that topic, let’s discover a remedy for Windows 11 customers who are experiencing audio issues.
What will you see here?
Check the Audio Levels to fix sound problems
Often, consumers are unaware that the audio is muted or that the volume has been adjusted to a lower level, which creates the impression that sound is not playing on Windows 11. In such circumstances, just unmute the audio or increase the level to see if the audio settings are accurate. This is how you do it.
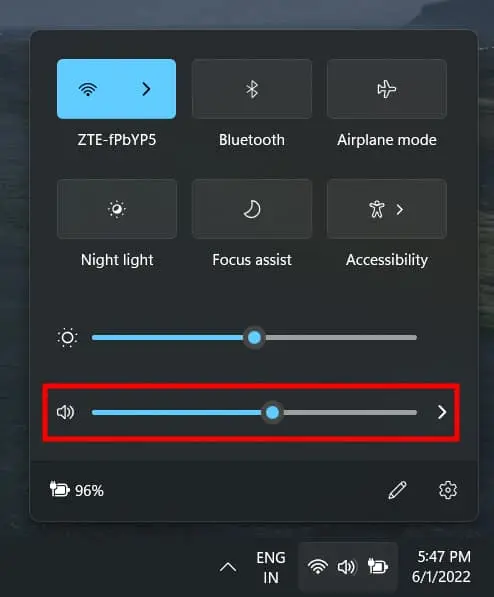
1. To begin, launch the Action Center by pressing the Windows 11 keyboard shortcut “Windows + A“. Unmute the sound by clicking the volume button.

2. Next, turn up the volume on your Windows 11 PC to see whether the sound problem has been repaired.

Choose the Right Audio Source
The second and most prevalent cause of no sound on Windows 11 is an audio source mismatch. Select the appropriate audio stream from the Action Center, and Windows 11 will send the audio to the appropriate output device. Here’s how to pick the best audio source.
- Use the “Windows + A” keyboard shortcut to reopen the Action Center. Click the “arrow” symbol next to the volume bar here.

Now, select the audio device you wish to utilize for playback that is linked to your PC. And your Windows 11 PC’s no sound issue will be resolved immediately. If the sound is still not functioning, try moving between alternative choices or restarting your computer and repeating this technique.

Connect the Audio Cable to the Correct Port
Users frequently connect the audio cable to the incorrect port, resulting in the no sound problem on Windows 11. Here’s a simple method for connecting your smartphone to the correct audio jack.
- Simply check for the green audio output connector located behind the CPU.
- Plug the audio jack into the green port.
- Connect the audio wire to the port with a headset label rather than a microphone on the front side. These ports will allow you to send audio to external devices. Following the process described above, ensure that you have selected the correct audio output source after attaching the device.
Make Sure the Playback Device Is Enabled
Due to a bug or an OS conflict, the system audio device may be switched off at times. In such circumstances, you must manually enable the audio device from the Control Panel. To discover how it works, follow the instructions below.
1. Open the Run prompt by pressing the Windows 11 keyboard shortcut “Windows + R.” Enter mmsys.cpl in this field. It will open the Sound window straight from the Control Panel.

2. Scroll down to find your audio output device. Right-click on it & select “Enable.”

3. Then, right-click on the device again and select “Test” to see if the sound is playing through the speaker or headphones you’re attempting to use with your Windows 11 PC. If the sound does not play, enable and test the other options to identify the suitable playback device.

Adjust Windows 11 Sound Settings
If none of the preceding approaches worked, try modifying sound-related settings in Windows Settings. To discover how it works, follow the steps below:
1. To begin, hit the Windows key once and type “sound” into the search box. Now navigate to the “Sound Settings” page.

2. Next, on your Windows 11 PC, pick the speaker you wish to utilize as your audio output device. Then, click the arrow symbol to bring up the speaker properties panel.

3. Then, if an “Allow” button appears under the “General” section, click it to allow programs on your Windows 11 PC to use this gadget for audio playback. This will enable you to use the built-in speaker on your Windows 11 PC.

4. After that, go down & make sure the “Enhance audio” toggle is turned off. When this setting is enabled, users may have no sound difficulties with Windows 11, thus it is best to leave it off.

5. Also, as indicated in the picture below, remove “Spatial sound” from the drop-down option.

Use Windows Audio Troubleshooter to fix Sound problems
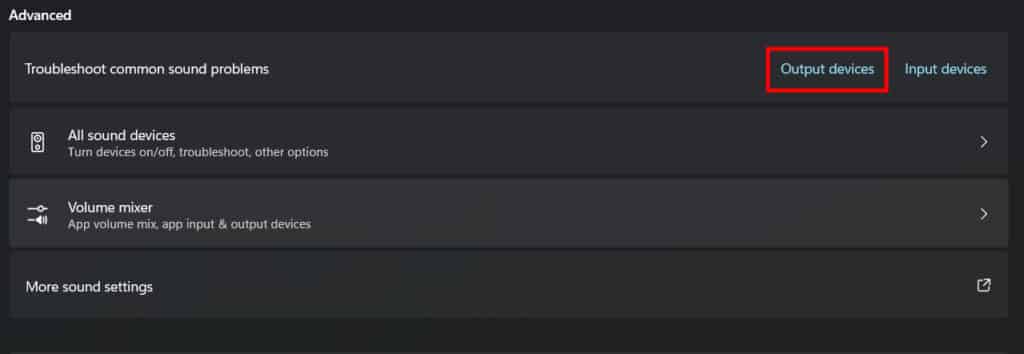
1. Return to the “Sound” settings page and scroll down to the “Advanced” section at the bottom. The “Troubleshoot common sound problems” option may be found here. Next to it, click the “Output devices” option.

2. Windows 11 will now detect the issue and resolve the no sound problem on your PC. If none of the previous solutions solve the problem, you should attempt the built-in troubleshooter.

Restart Windows Audio Service to fix sound problems
Finally, if nothing else has worked, restart the Windows Audio service. It’s a large service that handles everything audio-related in Windows 11. So, try the procedures below to see if they help you repair your PC’s sound output problems.
1. Open the Run prompt by pressing “Windows + R,” then enter services.msc and press Enter. The Services window will then appear.

Scroll down until you find “Windows Audio“. To access Windows Audio Properties, double-click. Change the Startup type to “Automatic” and click the “Start” button in the new pop-up window. Now, select Apply -> OK. Then, restart your computer to see whether the sound problem has been resolved.

Conclusion
Fortunately, many Windows sound difficulties are caused by a misconfiguration, making the cure as simple as cranking up the volume or selecting the appropriate audio device from the apps you’re using.
It is quite simple to determine whether you have no sound on Windows, but it is also possible that the sound only works occasionally, with specific devices, or within a specific software.
So those are the few solutions for resolving the no sound problem in Windows 11. I’ve included all of the information you’ll need to fix audio issues on a Windows 11 laptop or desktop. We recommend that you follow the tutorial step by step. That’s all we have for now.


